I got up early this morning and whilst the rest of the household were asleep took advantage of the quiet to rustle up some Chocolate Chip Cookies. As they continued to sleep I made myself a cappuccino and drank it on the front doorstep in the sun. Frothy milky coffee, chocolate chip cookies, my garden and sunshine – it can’t get much better!
Monthly Archives: August 2012
A Dress for a 9 year old
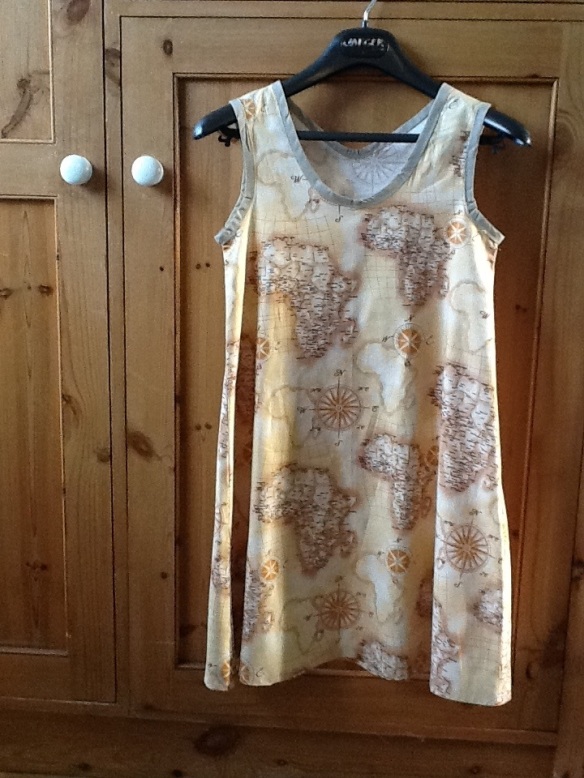
My friend’s 9 year old daughter asked me to help her make a dress to wear to a party her Grandparent’s are holding. I probably set unrealistic expectations by immediately agreeing to it before realising we only had a couple of days to find a pattern, buy some fabric and make the dress (not to mention fitting in all the other activities a 9 year old enjoys)
I decided we could probably make something like the sun-dress I made last year at Make Lounge; the pattern only has to fit around the bust and the rest is taken care of with a belt. I spent a bit of time worrying about how to reduce my pattern to fit a 9 year old and in the end traced the bodice from a Burda magazine then just extended the edges out to produce the wider bottom. Incidentally how do people sew for girls taller than 140cm? I only managed to find one Burda pattern that went up to that size after that it was adults sizing only.
 A visit to the local quilting shop yielded some Africa map print fabric (her Father, clearly a man with no taste, veto’d the batman fabric) and some bias binding.
We spent the morning cutting out and sewing the dress and matching sash belt. The fit was fine (thank you Burda) and the only alteration we had to make was to change the shape of the neck line.
The next day we finished the armholes and neckline with bias binding (tricky for both of us) and hemmed the dress. She was very particular about wanting the dress to finish just above the knee. We then spent quite a bit of time discussing how best to tie the belt and whether to wear the dress with leggings and a t-shirt or just on its own.
I must admit to feeling quite proud of the finished result. It was the first time she had tried sewing and never used a machine before. I was a bit worried that she would get bored part way through the project or find it too difficult to finish, but it was simple and quick enough that it was completed in no time.
She’s pleased as punch with the dress and everyone who has seen her in it has complimented her on it. Next time I’m told we’ll make matching batman dresses for both her and her sister!
Burda September 2012
I do love the excitement of getting the new Burda every month and looking at the patterns that are on offer. My desire for new projects always seems to exceed the time available so I find myself constantly earmarking patterns for the future but never getting round to them.


 This month’s Burda is dominated by a very simple shift dress with interesting looking curved darts at the side and across the shoulders and top of the sleeves. On the cover it’s shown in lace (108), the sewing lesson for beginners features it in in wool jersey (109), a wool blend houndstooth fabric and a couple of large pockets turns it 60’s style (107) and by shortening the pattern they have made it into a top (106). I could only find the pictures shown here on the Burda websites but there are much nicer ones available in the magazine (p11 and p41)
 I really like this dress and it looks simple to make, providing you can get a perfect fit. It would be a good way to show off a large print such as Marimekko Unikko (one of my all time favourites). I also think a sixties style wool version would be gorgeous, alternatively I could use the pattern for 105 which is another shift, this one being sleeveless with interesting pockets.
Incidentally the mustard trousers (110) shown above are referred to as being ankle length, 7/8 length or (a new one on me) flood length. I like the shape but I would probably go with the advice on page 10 to lengthen them as I wish.
 This month’s vintage pattern is this suit from 1958. I like the look of this, it reminds me of some of Doris Day’s outfits.
 Lastly there is a parka 129 (I love parkas but have far too many in my wardrobe already) and dress 120 in a petite size. It’s difficult to see in the picture because the model is also wearing a bolero but it’s one of those dresses where the side panels are made out of a different fabric from the central panel thus showing off and defining the figure.
Have you managed to get your copy of the magazine yet? Which patterns do you like?
Tracing Patterns
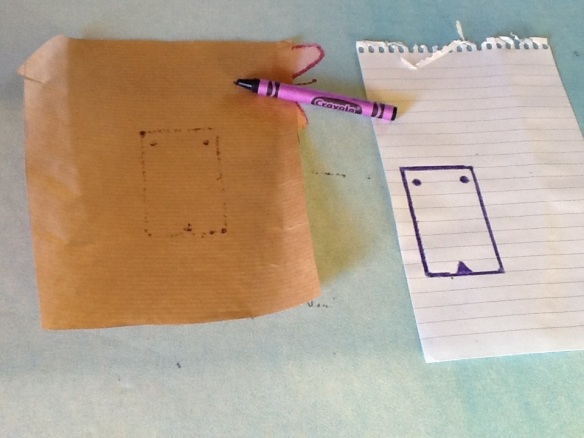
I found this tip in the latest edition of Threads magazine. If you draw over your pattern lines with a wax crayon and then place the pattern over a clean piece of paper and iron, the wax will transfer onto the new paper along with all your pattern markings.
I was keen to try this out so I drew myself a little pattern and transferred it to the brown paper above. The crayon had to be applied quite thickly and as you can see the transferred markings aren’t completely clear, but they are enough to give some guidelines to cut or draw over.
What do you think? Are they accurate enough to use for copying Burda patterns?
Incidentally, I use a similar technique to remove split wax from table cloths (always seems to happen at Christmas). I place some brown paper on the cloth and iron it. The wax transfers to the paper leaving just a small greasy stain which can be washed out.
Fitting Books
One of the reasons I like to make my own clothes is that I can get a better fit for my body than I can buying a garment. Having said that achieving a good fit is proving very difficult. I’m lucky in that I’m average height and a fairly slim build and can usually find clothes that sort of fit me, but I want more than that I want a really good fit; one that is flattering and comfortable.
Being an inveterate book buyer I have bought three books on the subject and I thought it would be worth giving a quick review of them here.
The first book I bought was one that a lot of bloggers seem to mention; Fit for Real People by Palmer, Alto and Schilling. This book goes though the main alterations required for a pattern using a group of women with different fitting issues. It recommends using the tissue fitting system whereby you in the pattern tissue to the person you are fitting in order to detect fitting issues.
Personally I found this book too difficult. The tissue fitting system is not simple and can’t be done on yourself. I know it’s best to get someone to help you but my sewing buddy lives the other side of the country so I’m on my own most of the time. Having Dolly does make it easier but even so I don’t find pattern tissue as malleable as these ladies imply. Also patterns printed from the Internet or traced from Burda magazines are on stiff paper which just won’t bend around your body to give an idea of the fit.
The book covers a lot of fit issues but I found that it was too complicated to use practically. Every time I have tried to use it to make an alteration I have found myself putting it back on the shelf and referring to one of my other books or making it up as I go along. Having said that a lot of people seem to swear by this book and there are some fabulous reviews on Amazon so maybe I will find it useful once I am more experienced.
The second book I have is the Busy Women’s Fitting Book by Nancy Zieman. This was published in the 80’s and I bought it second hand along with the Busy Women’s Sewing Book, both books are fairly short but packed full of useful tips. The fit book is very straight forward and recommends using pivot and slide techniques. It’s very easy to make the adjustments recommended once you understand where you have fitting problems, but I didn’t find the “Prepare to Fit” chapter which outlines how to determine where to make adjustments helped me understand the issues I was having.
The third book is Fitting & Pattern Alteration by Leichty, Rasband and Pottberg-Steineckert. It was a horribly expensive book but has proved to be worth every penny. The book describes every fit issue and technique to fit known to man, describing each problem a bit like a medical text book; I find terms like “bones may be smaller than average/ideal, there may be less weight deposit and/or muscle development than average/ideal” rather off-putting as if the person is horribly deformed in some way. It then explains what fitting problems these issues will give and provides a number of options for altering ready made garments, toiles and pattern pieces. It is the only place I have found that explains the order you need to make alterations in. For my Tova dress I needed to lengthen and widen the shoulder and add more to the bust. This book was the only one that told me to adjust the shoulder length first before making any other adjustments. Having done this I could immediately see the other adjustments I required were much smaller than I had originally thought.
One thing that this book does is to show which measurements you need to make on yourself and your pattern pieces to indicate in advance where you might have fitting problems. All the books do this to a certain extent but this one is much more thorough. I haven’t tried using this yet but it looks like a useful feature and may reduce the number of toiles that have to be made.
I should also mention the Colette Sewing Handbook which has a chapter on fit. Given that this is only one chapter in the book it is surprisingly comprehensive and very useful for simple alterations. It didn’t help me with my long shoulder problem and the bust alteration described doesn’t go into details about how to adjust around an insert (like on the Tova dress) or how to adjust a princess seam. I also didn’t find it much help in adjusting my Beignet skirt pattern which had a much deeper curve between the waist and hip than my body has. Having said that if you have the fitting problems she describes I think this would be a really helpful book.
So what have I learned from all these books?
1) The standard method for analysing whether you need to adjust your bust doesn’t work for me. I have more or less the same upper bust measurement as my full bust but I am a D-cup and so will always need to add more into any pattern.
2) The order you make alterations in makes a difference and I need to alter my shoulder length before I consider any other fitting issues.
3) The fabric you use for a toile needs to be as close as possible to the final fabric you are intending to use. I’ve been using some rather stiff calico and have found that most of my final garments need to be considerably smaller. My first Tova dress was made out of a denim that has quite a lot of give. The second (which I am struggling with at present) is being made out of linen and needs to be larger around the bust and across the back.
4) There’s a certain amount of hit and miss with this stuff. Leaving a lot of seam allowance is important.
5) I have loads and loads to learn!
O Brother!
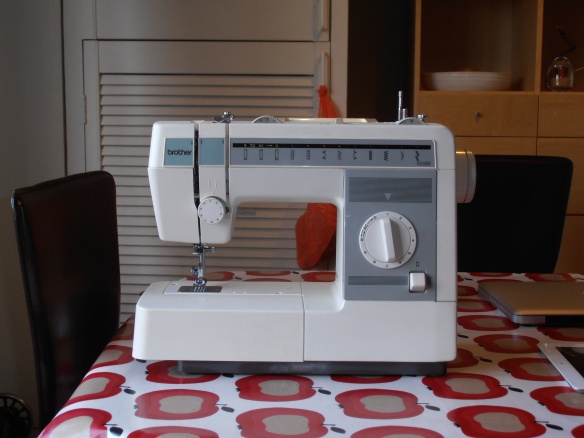 My Father has suggested on several occasions that I might like to take my Mother’s old sewing machine; last weekend I finally dug it out and here it is! I learnt to sew on an old Toyota that must have been bought in the early sixties and that is what I expected to find in the bottom of the cupboard this was housed in. I had forgotten that Mum replaced that machine with this newer Brother model shortly after I bought my Toyota in the late ’80s.
I assumed I would need to give it a service (or at least a good clean out) but it actually works perfectly. It has a good sturdy cover which has kept it free of dust and Mum was always good at keeping it clean and well oiled when she used it.
It runs much more smoothly than my Toyota and so far it hasn’t eaten any fabric or just plain refused to go on. The stitches are neat and even, even when sewing over lumpy bits. I need to do another search of the cupboard to find the accessories box as at present I am missing some of the pieces. Fortunately it takes the standard bobbins I use for the Toyota and although the foot is a clip-on one I think I can probably change some of the bits around so it fits the invisible zipper foot I have for my Jones machine.
I was thinking of replacing the Toyota (or at least buying a new machine) at some stage in the future as it can be a bit temperamental and I’m always worried that any fine or delicate fabrics will be snagged. Maybe I don’t need to do that now!
Frustrations
I love my Tova dress, it’s extremely comfortable and I have had several compliments when wearing it. I’ve worn it with leggings and on colder days over a t-shirt with jeans and a scarf.
 I decided a second dress was definitely needed. For this one I chose some beautiful mauve linen from Cloth House in Berwick Street. Cloth House always has good linens; I bought the grey, herringbone fabric I used for my first Beignet skirt there. This fabric has a slightly coarse texture and a loose weave, it’s a very blue colour on one side and a pinker colour on the other giving a subtly mottled texture.
The first problem came when I tried to cut the pattern out. This fabric will just not sit still! I think I managed to cut all the pieces on the grain but I am not sure. The front in particular looks like it’s “on the hu” as we say in Suffolk but, strangely, when I try ironing it it straightens itself out. This maybe why my front insert isn’t sitting quite straight at the moment (or it may be because of my non-existent top stitching skills).
The second problem is in the fit. I made a toile for the first dress and spent some time getting the fit right. I have noticed that I sometimes get a small crease across my back when wearing it but as it doesn’t feel tight I didn’t think I needed to alter the pattern. This second dress has been cut using exactly the same pieces but feels distinctly tight across my back. The only difference is the type of fabric; the cotton I used for the first dress obviously has more natural give than the linen I am now using. I will try letting out the seam allowances around the arms but the pattern only allowed for 1cm so there isn’t a huge amount to play with.

A sailor repairs a signal flag aboard HMS Alcantara 1942 – Cecil Beaton
My sewing machine features in the forthcoming Cecil Beaton exhibition in the Imperial War Museum!
Wiksten Tova Dress
 This is the Tova dress from Wiksten, another internet find. I made it out of some lovely soft denim from a shop on Goldhawk Road. It’s a very comfortable, casual dress and perfect for hot and not-so-hot summer days. The pattern can be shortened to make a top or made this length. I prefer the longer length but would find it a bit short without the leggings. I suspect that lengthening any further could make it look a bit frumpy.
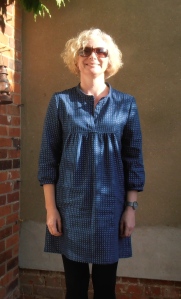 I had to make a few adjustments to the pattern to get it to fit me; 2cm added to the shoulder width, 2 cm added to the armhole depth and 1cm added to the bust. For the most part construction was very simple; sewing the insert into the front pieces was a bit fiddly but I took it slowly and basted each section as I went along and I think ended up with a reasonable result. I’ve often had a problem with inserting sleeve heads in the past but this time they went in very easily.
The pattern instructions were very clear with photos to illustrate each step. The only quibble I would have is that they asked for 3 yards of fabric but I only used 1.7m. Although the fabric wasn’t expensive it’s is frustrating that I have more than a metre left; enough to be irritating but not enough to do anything serious with.
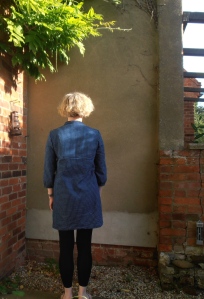 I think I will get a lot of wear out of this dress and now I have adjusted the pattern to fit me I intend to make several others. I have seen some lovely versions on flickr including some made out of flannel which would be gorgeous for winter.
Pattern Runway – Easy Kimono Dress
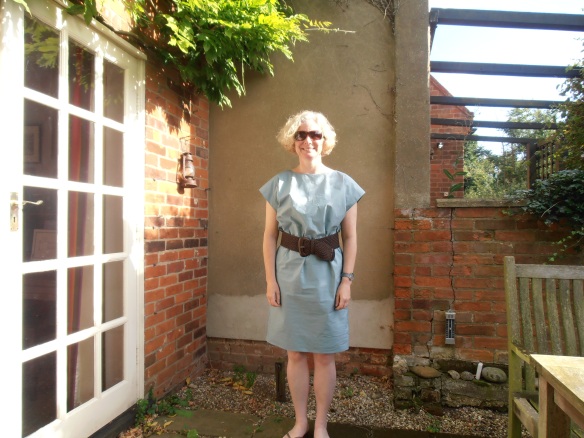 A couple of posts ago I mentioned that I was trying the Scout Woven Tee pattern from Gainline studios. I spent an enjoyable morning altering the pattern to fit me and making up a toile. The good news was that after a bit of jiggling around (mainly taking out some of the adjustments I had thought would be necessary) the toile fitted me, the bad news was that it looked hideous on me. I should have realised before I started that an unfitted top with very little structure was going to hang like a sack on me, no matter how nice it looked on all the other people who made it.
After a set back it’s always good to try something simple to get your confidence back and I thought the Easy Kimono Dress (clue in the name) would be a good place to start. I downloaded the pattern, stuck all the pieces together with glue (I know it says to tape them but I think glue gives a neater finish) and cut it out. A quick trip to Cloth House in Berwick Street yielded some duck egg blue poplin and after an afternoon’s sewing I had a new dress!
The pattern really is very simple, I based the size on my hip measurement; the top is loose and the waist elasticated so there are no fitting issues to deal with. The dress is very comfortable and easy to wear, if I can find the right cardigan or jacket I can see myself wearing it quite a bit. The poplin I used makes it look quite casual but a different fabric would give it a smarter look.
This dress was a sort of trial as I want to use the same pattern to make a dress out of some Marc Jacob’s crepe-de-chine I bought on eBay a few weeks ago. The fabric will need lining so I will have to make a trip to Goldhawk Road before I attempt it. It will be my first attempt at sewing silk so I want to take my time over it and make sure I don’t make any mistakes.


