Sew U Home Stretch

References to “Sew U Home Stretch” seem to crop up regularly on sewing blogs. Having tried “Built by Wendy Dresses” and not found it terribly useful I initially thought I wouldn’t bother with home stretch but it was one of the books people recommended when I got my overlocker so I decided to put in an order on Amazon. Actually, this proved to be rather difficult; although Amazon has all the other Sew U books listed home stretch appears to be rarely available. You can get it through their market place vendors but as you have to pay postage and packing this makes it more expensive. Anyway the stars were in the correct alignment the other day and I eventually managed to order it.

For those of you not familiar with the book it has five sections. The first being about knit fabrics and how to sew them. I found this immensely useful as it offers all sorts of tips I haven’t picked up elsewhere. It talks a lot about over lockers and cover stitch machines as well as how to sew knits with your ordinary machine. It explains the stitches you should use and why some are more suitable then others as well as going into detail about needles and threads. There is a good section on fabrics (doesn’t mention pontes!) including advice on ribbing.

The next three sections deal with the basic patterns; a crew neck t-shirt, a raglan sleeved, hooded sweatshirt and a dress. Each chapter suggests various modifications you can make to the pattern to achieve a number of different looks. I haven’t tried any of the patterns yet but they look simple and the modifications are clearly set out. One issue I have is that like the other Sew U books they use illustrations to show the finished garments and it’s not always easy to imagine them as real clothes.

The last section is about modifying and reworking existing garments.

I can see myself using this book a lot; the first section is invaluable and goes into a lot of detail I haven’t found in other books. I particularly found the section on overlockers useful and although I can’t imagine ever getting a cover stitch machine it was interesting to read about their capabilities.

The t-shirt and raglan top could be very useful basic patterns; I’m not so sure about the dress pattern but that’s possibly because I can’t imagine myself wearing any of the designs she has suggested. The last section I can’t see myself using, I’m not really interested in remodelling clothes, although I am impressed with those that do.

To be clear this is a beginners book and the patterns in it are for simple everyday clothes that can be found in GAP or any number of other shops. It’s strength is that by focussing solely on knits it makes them appear unintimidating; none of the techniques are complicated just a bit different from those you use for woven fabrics.

Craig Lawrence

One of the benefits of being a friend of the V&A is that you are invited to various members only events.  Last night I attended a talk by Craig Lawrence, a young knitwear designer who uses unusual materials and techniques to create garments that are somewhere between high fashion and art.

Barrier tape!

As a boy Craig was taught to knit by his Grandmother and he developed his technique at Central St Martin’s and whilst working with Gareth Pugh.  He said he liked knitwear because he found the process of creating the fabric for a garment adds a dimension which would otherwise be missing.  Originally he eschewed the use of traditional yarn because of the cost and started to look out for interesting materials he could use instead. He found pound shops and DIY stores could supply him with black bin liners and barrier tape; anything so long as it came in a long strand.

Many of the garment he knits are made on knitting machines but others are made by hand using extraordinarily fat needles.  Some garments are made using a loop stitch and it will take up to 20 minutes to pull each loop through to get the right texture.

Selfridges window – apparently the model was tipped like this to give emphasis to the mitts which were for sale!


He has exhibited in Japan and Hong Kong as well as London and has dress Lady Gaga, Bjork and Tilda Swinton.

I love that the V&A supports young designers like this and gives them a platform to display their work.  Craig’s garments are beautiful, innovative and inspiring; full of light and movement as if they have a life of their own.


Making your mind up

Thank you all for your comments on Vogue 1179 formerly known as the “I’m Not Quite Sure Dress“.  I have worn this quite a bit over the last few days with a grey wool sweater I had forgotten I had in the back of my wardrobe.  I always thought it would be the most comfortable dress in the world (it is) and now I have got used to the style I also think it is growing into one of my favourites; I’m even thinking of making another.  I keep catching a glimpse of myself in mirrors and windows and quite enjoying seeing the unusual silhouette. As Catja pointed out it’s the dress that that’s shape not my body.

Also thank you for all your comments on styling.  I’ve decided not to wear it with the belt as I think this is a more sophisticated look and somehow I feel a bit like last year’s teenager with the belt around it; it’s nice to know I have the option however.  In the pictures I am wearing some grey suede ankle boots with a medium heel, I’ve also tried it with some old brown lace up ankle boots which have a low heel which also look great.

The “I’m Not Quite Sure” Dress

AKA Vogue 1179

OLYMPUS DIGITAL CAMERAThis pattern has been around for a while and I’ve seen several versions on the internet; Karen has made it four times, Eugenia has made is three times and Kirsty has made it once. All three expound the comfortable fit, the speed and ease of construction and the stylish look.

OLYMPUS DIGITAL CAMERAWell, I completely agree about the first two. Anything made of knit with no waistband is going to feel like wearing pj’s in the middle of the day. As for construction – the dress only has three pieces and there’s not much required in the way of fitting so, rather like the other DKNY dress V1250, it can be put together in an afternoon.  Having said that I did have a bit of an issue putting elastic around the armholes and one has ended up slightly stretched out of shape.  I also made a bit of a mess of attaching the collar and had to correct it with some (pretty dodgy) top stitching.  Someone with a bit more experience in sewing knits would have managed to avoid these issues  – I’ll know what to do next time.

The main problem I have is with the style. I can’t decide whether it is casually elegant or just makes me look like a sack of potatoes. I like the fit around the shoulders and back which I think is quite flattering, however, there is a lot of fabric hanging from the bust which sort of billows out.  A belt helps a bit, but I’m not really convinced. I’m hoping that its going to be one of those garments which grows on you once you’ve worked out how to wear it.OLYMPUS DIGITAL CAMERA

I’m also having a cardigan quandary; I feel the cold and really need to work out a way of wearing it with something warm which doesn’t add to the sack of potatoes problem.  A wool jumper underneath helps.

I should add, the fabric came from fabric godmother and is a lovely heavy weight jersey, perfect for this pattern. I’m trying to get away from my diet of plain fabrics and start wearing a few prints. This is the fourth piece of fabric I’ve ordered from Fabric Godmother and I can recommend their speed of service as well as the quality of the goods.

Have any of you made this dress? Has it become a well loved and much worn garment or does it lurk in the back of your wardrobe reminding you that you don’t always get it right?OLYMPUS DIGITAL CAMERA

I Made A Tent (or Why You Should Always Make A Toile)

OLYMPUS DIGITAL CAMERALast month I had a few days in my little house in Suffolk. The house is on the coast and at times it feels like there is really not much between it and Siberia. On the Monday we had a blizzard, not a huge amount of snow (5cm or so) but biting, strong winds and a temperature well below zero. I lit the fire, turned up the central heating and decided to make a dress.

The pattern I used was Vogue 8873; a new pattern for this season. On the surface V8873 looks like a million other patterns but it’s actually a bit different. For a start it has a lining! I know shock horror a dress with a lining, I always find it irritating when dress patterns don’t have instructions for making a lining; linings make dresses more comfortable and make them hang so much better. Secondly, the front is slightly unusual in that it has a fitted bodice with two pairs of darts and a square neck and then has an over bodice which has the cowl. This adds a level of practicality and modesty that cowl neck dresses sometimes lack. The main bodice itself is quite attractive and would probably look good without the over bodice. I did however wonder whether it was necessary to put in four darts that would never be seen, a couple of darts to give the necessary fitment would possibly have been sufficient.

The fabric I used is a Roma jersey from Fabric Godmother, it’s the same as I used for my grey Burda dress. Now I must admit to a confession here, I’m never really sure what a ponte is and what the difference is between pontes and some of the thicker, double jerseys you can buy. I’ve also not seen the word ponte used in fabric shops in the UK, is this because it’s not a term used here or is it just that I have been visiting the wrong fabric shops? The pattern back called for a woven or a ponte and as this jersey is so thick and doesn’t have a huge amount of stretch I assumed it would be suitable.

Stupidly, I didn’t make up a toile. I’ve made a couple of Vogue patterns before and they’ve fit me reasonably well with only minor tweakings which could be made on the final dress, so I thought it would be the same with this one. Unfortunately this proved to be a mistake. The “close” fitting bodice has 10cm of ease built into it! This seems excessive even if the dress were made out of a woven fabric, as I am using a jersey (albeit a very thick jersey) the dress swamps me.

Fixing it will mean unpicking everything! I think I can get the bodice to fit by converting the darts on the front to princess seams, taking out more on the back darts and reducing the width of the over bodice at each side. I will also need to adjust the skirt but I can do that through the back darts and side seams. The sleeves are also too wide and will need taking in a bit.

All this makes me feel very despondent, it will be a nice dress but at the moment I don’t have the will power to start the unpicking.

Loving John Lewis

OLYMPUS DIGITAL CAMERAI’ve written elsewhere about the disruption to my sewing mojo caused by moving within London.  Last week I decided I needed to resolve this once and for all so I set about rearranging the furniture in our drawing room and now I have a dedicated sewing space.  My table is in a light and airy position next to the window, it will be a bit chilly in the winter but in the spring sunshine it is a pleasure to work there.

The other cause of my lack of mojo was my overlocker.  I was given a second hand overlocker at Christmas and despite a few initial misgivings have fallen completely in love with it and the easy finish it gives me.  As the overlocker is sitting in Suffolk this has meant that anything I want to make in London has to wait until I get to Suffolk so I can give it the treatment.  I did try bringing the overlocker up to London, but then I had the opposite problem.  Short of lugging the thing backwards and forwards the whole time the only solution was to get a second machine.  This might sound like a huge extravagance (actually it is) but I have a John Lewis credit card and after years of carefully saving up the loyalty vouchers you are given (alternative view – years of over spending on my credit card) I had enough to get a Janome 9200D.  I could, of course, have spend these vouchers on groceries, but where’s the fun in that?

The 9200D is a basic model very similar to the one I already have but has a slightly different threading mechanism.  It came with a DVD which shows all sorts of different ways of using an overlocker  – gathering, rolled hems and so on, which I’ll have to try.

Anyway, no excuse now not to get on with my sewing.  I am still fitting the toile for my jacket and have also made up a dress which I will blog about once I have photos.

Spring Skirts

OLYMPUS DIGITAL CAMERALast summer I helped Saskia, my boyfriend’s 10 year old daughter make a dress. This year, remembering the Batman fabric the local quilting shop stocks, she and her sister Freya (14) asked for skirts. To join the party, and as Spring appears to have finally arrived, I decided to make myself a skirt as well.

We started by deciding on the design of the skirt and spent a bit of time searching through magazines, the contents of our wardrobes, discussing the difference between knit and woven fabrics and deciding what we would use our skirts for. In the end Saskia chose a short full skirt, Freya also chose a short skirt but opted for a much straighter design and I wanted a pencil skirt.

OLYMPUS DIGITAL CAMERA

To make Saskia’s skirt we made a loop of 5cm wide black elastic (from McCulloch and Wallis) to go around her waist which was 62cm. We then cut two rectangles of fabric 65 cm wide (62 cm plus 2×1.5cm seam allowance) and a bit longer than we wanted the skirt to be. These were sewn into a tube and then we did a bit of fitting by putting the elastic around Saskia’s waist and pushing the fabric up under it.

OLYMPUS DIGITAL CAMERA
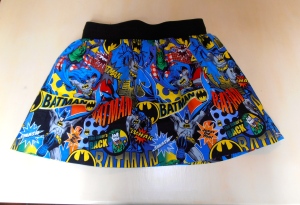
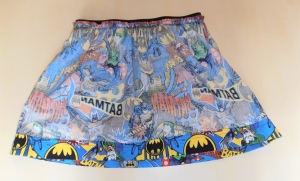
This showed that the skirt was going to be too full so we cut 8cm off each of the rectangles (final size 57cm each) and resewed them. We then  marked 8 evenly spaced points on both the waistband and tube and pinned the two together. We sewed the two together by stretching the elastic to the same length as the waistband and stitching with a straight stitch. To strengthen the seam we did the same again but using a zig zag stitch. The skirt was then hemmed and announced as being perfect.

This was the easiest skirt to sew and great for a beginner as it came together so quickly. The black elastic looks much more stylish than the usual elastic with casing around it and I understand feels very comfortable.

OLYMPUS DIGITAL CAMERAFreya, at 14, has a lovely, tall, willowy figure and is much more fashion conscious than her sister, for her skirt I chose a Burda pattern (8155). This is a very simple pattern which produces and lovely well fitted skirt, ideal for customising as you want. Unfortunately I didn’t have any invisible zips to hand so I had to use a standard zip. I the past these have bought me out in a cold sweat but this time I tried putting two strips of interfacing down either side of the slot and these really helped me get it in first time with none of the gaping I have got in the past. I know how much you all like photographs but unfortunately I don’t have one of Freya wearing her skirt.  It’s also in need of a final fit and hemming, I know it will be declared not short enough but as she has such long legs I don’t want to cut it any shorter until I am sure.

OLYMPUS DIGITAL CAMERAMy skirt is the most complex of the three and has a lining, a petersham waistband and an exposed zip. I used my block to make the pattern so I had no problems with fit.  I love the finished garment, my only quibble being that the quilting cotton (I should have known better) is very prone to creasing.

There were instructions in a recent issue of Threads on how to install exposed zips but they sewed the zip on the outside of the garment and I wanted it sewn on the inside with the sides of the zip to be covered by my fashion fabric.  The method I used is similar to that described in the Threads article as follows:

  • I placed a 3cm strip of interfacing and little longer than the zip down each side of place I wanted to insert the zip.  Having interfaced the zip opening on Freya’s skirt I don’t think I will every try a zip without doing this  first.
  • I then sewed a line of stay stitches down each side 2.3 cm from the edge of the fabric and horizontally across at the bottom.  The zip was 2.5cm wide and I had a 1.5cm seam allowance so this meant about 4mm of the zip tape on either side would be covered (2.5/2+1.5-2.3=0.45)
  • The seam was finished starting 1 cm above the horizontal lines of stay stitching I had just sewn.
  • I cut diagonal lines down into the corners of the stay stitching and folded the fabric back along the stitches giving me a casing into which I tacked the zip.
  • Lastly I top stitched the zip in place, unfortunately at that point my machine and I had a difference of opinion and as a result my top stitching isn’t as neat as it could be!

OLYMPUS DIGITAL CAMERAThe lining was then made up, excepting the back seam which I sewed to the two zipper tapes.  At this stage I was in a bit of a rush, if I were to do it again I would hand sew the lining as it hasn’t given me the neatest finish.

The lower part of the seam was then finished and the top of the skirt and the lining were basted together.

The waistband was made using a technique I picked up from reading the instructions for a skirt in the last edition of Burda magazine. I started by heming one end of the petersham ribbon and then basted it from one zipper opening all along the inside edge of the skirt until I reached the far end. At that end I left about 4cm (for the overlap) and folded it back on itself, this time sandwiching the skirt and lining between the two pieces of ribbon and sewing it along the front of the skirt. I then folded a hem to match the first and top stitched up the side and across the top. This is a very simple way to make a contrasting waistband, it’s also very comfortable.

Overall I’m very pleased with all three skirts, they were fun to design and quick to make. They were also cheap; I managed to get them out of 3m of fabric and some bits of haberdashery I had lying around in my sewing box.