Pattern Magic II

My friend and I have spent the last two Saturdays at the fabulous Morley college completing the Pattern Magic II course.

Over the two days we managed to complete two exercises from the book. The first was an exercise called “fundamentals” where you create a garment replacing dart shaping with style lines. This involved creating a bodice, drawing the style lines onto it, cutting into the various style lines and flattening each piece out to create a pattern and lastly making up a toile using the new pattern pieces. Sounds simple? Well I was extremely glad our tutor, Moni, was on hand to help. I managed to draw up the pattern in the class and took it home to make the toile. Despite marking the pattern with notches and so on, working out which piece went where gave me a serious headache, and that was before I realised how difficult it was going to be sewing around all the tight curves I had made.

The second exercise was called “wearing a balloon” in this you created a bodice with a large collar that expanded and became part of the bodice. The drafting required to do this was probably more difficult than the drafting required for the fundamentals exercise; the book is not always as clear as it might be and I was very glad of Moni’s assistance in guiding us through the process. The final toile is very elegant and now I understand how it was created I am keen to have a go at making one using my own block as a base rather than the tiny Japanese ones we used in the class.

I would definitely recommend this course if you are interested in the Pattern Magic books. It has fired my imagination and given me the confidence to try some of the effects out for myself.

Crow Waltzing

OLYMPUS DIGITAL CAMERAA few weeks ago I needed a quick project to see me through a barren week, I had just finished a cardigan (well finished the knitting still trying to work out what I am going to do button wise) and had ordered some yarn for my next project but had nothing to knit in the mean time. I happened to be passing Loop (as you do!) and found the pattern for the crow waltz scarf , a couple of hanks of Old Maiden Aunt and I had the perfect filler-in project.

The pattern is for either a rectangular scarf or a triangular shawl, I’m more of a scarf person so I went for that option but decided on using the same brown/purple colour way as the pattern gives for the shawl. Old Maiden Aunt is fabulous stuff, I made a small scarf out of a hank a couple of years ago and during this cold winter it has been my constant companion. My only complaint is that I find it a bit splitty and was constantly having to check my stitch count to ensure I wasn’t adding in stitches by accident. The two colours I used have the fabulous names of Hebridean and Derelict Daughter.

Juju Vail at Loop designed the pattern and chose the colourways; I have often admired her garments in the past. This one has a very pretty lace edge (the crow waltz) a few rows in a simple garter stitch interspersed with an eyelet row and then the bulk of the scarf is knitted in a basket weave stitch using the two colours to produce a lovely soft tweedy texture.

It took rather longer to knit than I had hoped. In part because I kept getting distracted – what with moving and sewing and all the other stuff life has thrown up in the last few weeks I haven’t really had much time for knitting.

I love my scarf, it’s perfect for these cold days (is spring ever going to come?). More details can be found on Ravelry.

Eight Pounds!

OK this one my turn into a bit of a rant.

I’ve just been charged eight pounds!

and what I have I been charged it for? Well I ordered some sewing supplies from the States on which I had to pay £5 customs charge, which at 20% is day light robbery enough, but to add insult to injury the Royal Mail charge £8 as a handling fee. Did you know they did that? I didn’t, had I done so I wouldn’t have ordered the goods. This means that my order (for £25) is now costing £38 and increase of more than 50%!!!!!!!!!

So that’s it, never again am I buying anything from outside the UK (………..well until the next time).

Evalotta

I have written before about our potentially fabulous but currently rather gloomy flat.  To while away (another) snowy and miserable day I decided to cheer up our entrance hall by making a new curtain to cover the glass panels in our front door.   The curtain we inherited with the flat was made out of some dubiously thin fabric of some antiquity which was too long so had a knot tied in the middle of it to ensure it didn’t get in the way when you opened the door.  The dust in the fabric made it impossible to tell what the original colour had been but it looked as if it would disintegrate if tried anything as radical as washing it.

OLYMPUS DIGITAL CAMERA

Hmmm….as I said the hall gets next to no natural light so is difficult to take photos in.

As the hall gets almost no natural light (and like the rest of the flat is painted grey) I wanted a cheerful fabric  brighten it up.  Evalotta from Ikea (where else) provided the perfect solution.  I used 2.5m of fabric, hemmed each of the sides to hide the selvedge, created a tube in the top to hold the curtain bar and put a hem on the bottom.  A very quick, cheap and satisfying project.

Like the rest of the flat, the hall will only look properly loved once it is painted but in the mean time my curtain does make it look a lot more cheerful.


Sewing Space

Since moving I feel as if I’ve lost my sewing mojo a bit. The problem is that I haven’t worked out exactly where I’m going to sew and how it’s all going to work. I have space for all my fabric and patterns but they are all in a cupboard rather than in easy to see piles on shelves. My tools and haberdashery are also hidden in various boxes within the cupboard and more difficult to find.

I theory I will have a sewing table, we have earmarked the table but it’s covered in old computing equipment that needs to be disposed of. It’s also in a very dark part of the room and we need to reorganise the furniture so it can sit nearer the window. I’m not sure where the best position will be for the ironing board.

I like things to be neat, tidy and organised. Sewing is a messy enough activity without having a proper workspace. Does anyone else have this problem?

Jacket Toile

Last weekend I moved flat and spent most of the week unpacking and running backwards and forwards to Ikea. Funny, I’ve never had any problems with their products in the past but two items I bought this week had faulty components. Ikea furniture is great but their customer service is possibly the worst. Anyway most things have been unpacked now. I just need to work out how to fit all our pots and pans into our incredibly badly designed kitchen (large but with no storage or work space!)

OLYMPUS DIGITAL CAMERAI took the opportunity of a few quiet hours this weekend to make a toile of my jacket. The
pattern I am using is Burda 102 03/2013. Thank you for all your useful suggestions from my last post particularly the link to the tailoring sew along. Having read through this I think I will follow her construction method as it’s my first jacket and it’s clear this is taking me into a whole new world of techniques.

Some thoughts occurred to me as a I made my toile;

Firstly, I should probably try to be more accurate when tracing Burda patterns. I originally started by trying to trace onto manilla parcel paper using tailors carbon paper and a wheel, however I didn’t find this very satisfactory. It’s difficult to get carbon paper of any size and if you move it as you trace you can knock your pattern out of kilter. Also the marks left are quite indistinct, I really need large sheets of dark coloured carbon paper for this to be successful but I’ve not found a source in London as yet.

A friend suggested a better (though slightly more destructive way) would be to use a spiked wheel. To do this I place a foam board on my kitchen work surface, then a layer of brown paper and lastly the pattern. The spiked wheel punctures through to the foam board which protects the work surface. I use the kitchen work surface rather than a table as its slightly higher so puts less strain on my back. This works very well and gives me a clear line. The problem is that I then go over the line free hand with a thickish felt pen. I think I need to rethink this step and use a finer pen and probably guide it with a ruler or French curve.

How do you trace your Burda patterns? Have you found a good source of carbon paper in the UK?

Secondly, I need to get a grips with sewing notched collars. I did this one late at night using a mixture of Burda’s instructions and my own intuition. It didn’t really help that I had obviously missed the mark on the pattern piece where the notch was supposed to go. This morning I looked it up in my DK Sewing Book and found a much simpler method of making them.

20130304-133851.jpgThirdly, the dart is quite tricky on this jacket and incorporates a horizontal seam which runs at right angle to the bottom of the dart legs. If I do make a mess of this the pocket pieces will hide the worst of it, but for myown satisfaction I’d like to get it right.

Lastly, I really need to spend some time practising sleeves. Sometimes they work and sometimes they don’t. I have a feeling the difference is to do with the amount of ease in a sleeve (but on this jacket I seem to have one sort of ok and the other really bad so that doesn’t apply here). I’m also really bad at working out which is the front and which is the back of a sleeve

OLYMPUS DIGITAL CAMERA
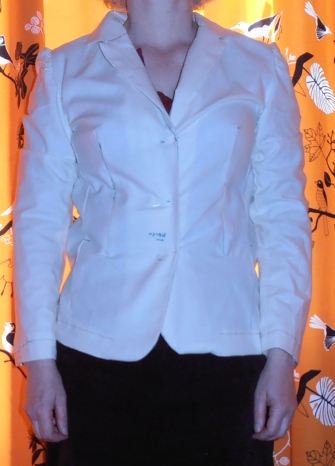
So what do you think of the fit on this toile (apart from the fact that I am so lopsided)? I find it difficult to tell given that the calico I’m using is very light and drapey and I intend to make the jacket in a medium weight wool.  I think it would be more flattering if it were a bit more fitted around the waist, maybe starting with a smaller size might help.

I’ve got a curved wrinkle that runs from the armscye over the top of my breast, on the pictures it only came out on one side but it’s apparent on both when I stand in front of the mirror.  I probably need to pinch that out, but I need to be careful of not taking fabric out across my bust as it fits quite well there. Have you any suggestions as to how I fix this?

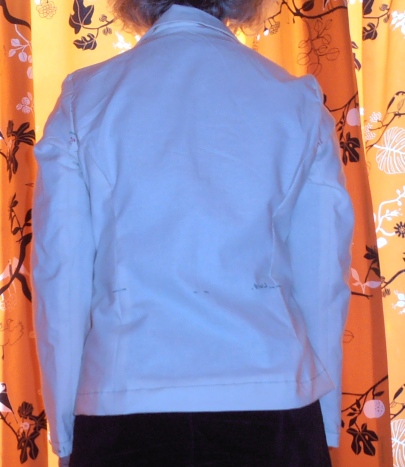
I’ve also got a bit of dragging under the bust where I think it’s being pulled from the back, I have a broad back so I may be able to fix this by letting out a bit on the arm/side seams.

Lastly, the back looks too big to me.  Almost as if I could do with a smaller size. Again it’s difficult to tell in the calico as the added structure of a firmer fabric might help.