Spiralising – Making up the Dress

If you followed my previous post you now have a pattern which looks like a long rhomboid with necklines and armholes at one end.  The long spiral seam is shown on the diagram below in red/mustard.  This is cut on the grain so there is no problem with it stretching as you cut the fabric.

 Drapey fabrics work best.  I have made spiral dresses out of viscose jersey, silk crepe de chine and polyester triple crepe. All worked well.  You will probably want to wear a slip underneath as lumps and bumps do tend to show up.  Stripy fabrics are lovely as the stripe will curve around your body, also if you have crosswise stripes on your fabric it is very easy to match up the seam line.  The stripes on my silk dress ran down the fabric so parallel to the seam, on my jersey dress they ran across the seam.

You will need a lot of fabric, I used 2.5m but it will depend on how long you have made your pattern.  You only use quite a narrow piece so, if you’re using wide fabric, you will probably find you have enough left over for another dress. Handy if you have an accident with your over-locker (don’t ask!).  I made a pair of sleeves and a pencil skirt with my left over red crepe and still had quite a bit of unused fabric at the end.

When you put the pattern on the fabric don’t forget that you have not included any seam allowances along your spiral  seam. You could add these to the pattern but I found it relatively simple to  just cut my dress 1.5 cm wider on both sides.

To make up, sew along the spiral seam matching the notches you included when you made up the pattern, then press and finish.  I used a french seam on the silk dress , overlocked the seam on jersey and an ordinary seam on the triple crepe – in other words it doesn’t really matter which sort of seam you use. After that sew the rest of the dress as you would any other i.e. sew the shoulders, finish the neck line, add sleeves if you are using them.

Bias fabric tends to stretch so I recommend you hang the dress in the wardrobe for a few days before you hem it.

I’d love to see any dresses you make using these instructions!

Spiralising – the Pattern

I’ve been promising you the instructions for making a spiral dress and here they are!  I was given these by my lovely friend Alice Prieur who teaches pattern cutting at Raystitch, she has give me persmission to write a post about the technique.

You can make Spiral Dresses out of any fabric – both jersey and woven – it just needs a bit of drape.  If you use a stripy fabric you will find the stripes spiral around your body but plain fabrics look good too.  You can add sleeves or leave without.

What you will need;

– A pattern with a neckline, armholes and shoulders that fits well and looks good on you.  The neckline needs to be large enough to fit over your head without any fastenings.  You could draft this or use your block if you have one.  If you are making a dress with sleeves you will need those too. Don’t worry about bust shaping you won’t be needing that.

– A very large piece of paper.  This needs to be slightly wider (2-3cm) than your hips and a bit longer than your finished dress after allowing for hems and seam allowances.  Spot and cross paper is ideal as it will help you get your grainlines and angles straight, but any paper will do

– A long ruler and something to measure a 45 degree angle. I have a pattern master but it’s  not essential to use one providing you are confident about drawing the pattern accurately

– A big space to work on!

– Your hip measurement, this is the only measurement you need but it’s vital you get this right as there is no room for fitting once the dress is cut out.

Step 1 – draw two parallel lines the exact width of your hips apart. Then add a third line in the centre which is half way between the two.

Step 2 – copy your neckline and shoulders in, front on the left, back on the other.  You might need to add or remove a little from the arm holes at this stage so they fit between the lines.  The bottom of the armholes should meet in the middle.  Don’t forget to add in your notches

Draw a line across the bottom of the pattern where you want your dress to end adding a bit for a hem line.  You may find you need to adjust this when you sew up the dress.

  Step 3 – Draw a line at exactly 45 degrees from your front armhole across the pattern and down to the far side.  I started my line at the front sleeve notch on the armhole, but it doesn’t really matter where you start.  This will become your seam line so I suggest you sprinkle a few notches along it to help accurately sew it.

 Step 4 – cut along the diagonal line so you get what looks like two triangles with necklines and armholes at one end .  Then simply move the piece across to the right and paste the two long edges together to make a rhomboid.
If your diagonal does not meet exactly in the bottom right hand corner (which is
fairly normal) you might want to take a little of the bottom left and move it to the bottom right so the corners match up.


And that’s it, you now have your pattern! I will write a separate post about how to sew up.


Late addition to this post.  Hopefully you will have spotted that I haven’t added any seam allowances.  You can add them now or, do as I do, and add them in when you are cutting out the fabric


Spiral Party Dress


 Thank you all for your comments on my post about the red Spiral dress.  I am writing up the instructions for the pattern but in the mean time I have another spiral dress to show you.

 This was one of those projects that started well and then sat in the wardrobe “maturing” for a couple of years whilst I decided what to do about it.  FoIMG_1774rtunately my lovely friend Alice’s birthday party gave me the motivation and impetus to get it finished.

I used crepe de chine from Beckford Silk – silk is lovely to work with and this fabric is one of the best. As always spiral dresses take a lot of space to cut out. I had stiff knees when I’d finished as the only space big enough was my bed room floor.

I pinned the spiral seam wrong sides together, ran it through the overlocker, pressed it right sides together and sewed the seam to make a very neat and easy French seam.  Using the overlocker gives an even edge and ensures you don’t have any mishaps with the seam allowances.  I was worried that with such a long seam it would be easy to find I’d made a mistake and I didn’t fancy unpicking the silk.

After that it sat in the wardrobe, and then sat in the wardrobe some more.  The problem was that I could see it had potential but I wasn’t quite sure how to finish it.  I wanted to add sleeves but didn’t want to used the striped fabric.

IMG_1770
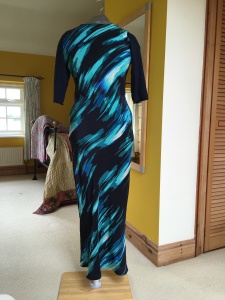
Eventually inspiration struck and two days before the party I took out my stretch sleeve block and cut a pair of sleeves from some viscose jersey.  I then added a facing at the neckline and a couple of hours before the party a rolled hem.

I’ve avoided the trend for maxi dresses up to now as they tend to make me look a bit dumpy, but I am pleased with this one.  The bias cut is flattering and very comfortable to wear.


Spiralising


I’m told spiralised vegetables are all the rage.  I’ve gone one further and spiralised my dress.

The pattern started off as the ultimate shift dress, turning it into a spiral dress was very simple and didn’t take long. The biggest challenge was finding a big enough piece of paper and the space to cut it out. Sewing it up was very simple, no darts and no fastenings needed, just one very long seam which spirals around your body.  The clever bit is that the seam is actually cut on the straight and it’s only when you sew it together that you get the bias effect. I will give instructions in a future post, I warn you though spiral dresses are very addictive, once you’ve made one you won’t be able to stop!

This dress was made out of triple crepe. I’ve made a few dresses out of this recently, feeling very brave as I overcome my fear of man-made fabrics.  I think it’s something to do with my age, polyester in the ’80s was definitely something to avoid.  These days I find it useful to have dresses that pack down into my cycling bag and come out looking smart when I get to work.  I’m also pleased not to spend all my pocket money on dry cleaning.  I have lined the dress as the bias tends to cling, but a slip would have done the trick too. After making up the dress I let it hang in my wardrobe for a couple of weeks before I hemmed it and I found it interesting that the crepe stretched about 10cm whereas the lining didn’t stretch at all.  I’d read that this happens to bias cut fabric but hadn’t expected the effect to be so dramatic.

I feel slightly strange wearing this dress as I made it mid calf length, most of my dresses and skirts are knee length. The longer length takes some getting used to, and it definitely needs heels to set it off.

img_0836

Spiral Dress

OLYMPUS DIGITAL CAMERAAn instant dress this week made using my stretch block!

I was reading my blogs the other day and came across Alice & Co in the South Pacific. Warning clicking this link will make you green with envy!  About half way down the post there is a picture of Alice in a spiral dress which immediately got me thinking about how I could make such a thing.  Fortunately Alice is a friend and very kindly gave me the secrets of how to cut the pattern.  It’s actually made from one piece of fabric which is cut on the straight grain but, cleverly, once you sew the one long seam that runs around your body, you end up with a dress that sits on the bias.

As the technique is Alice’s I won’t divulge how you make the pattern here but it really is extremely clever and hopefully you will agree that it makes a very flattering dress.  The pattern took me quite a while to draw up, mainly because it’s on such a big piece of paper and I didn’t have a table big enough to fit it all on.  Also I was trying to be as accurate as possible with my lines and angles so I could get the stripes to spiral around and meet up in the right place.

There is no room for adjustment once you have cut the fabric out  so I made this one out of some extremely cheap jersey I bought from Tia Knight.  Cutting the dress out was very trying!  The viscose jersey moved at the slightest opportunity and all the edges curled like mad.  I also discovered that the stripes were not at right angles to the selvedge – I think jersey is often made in a tube and then cut open, I suspect that the cutter didn’t take the care they should have to ensure that it was straight.  It probably took me three hours to cut the whole thing out.

OLYMPUS DIGITAL CAMERA

Yes there is a seam there!

The pattern piece is a bit less than 3m long and about 70cm wide. In theory a 3m length of jersey which is 150cm wide should give you enough for two dresses – if you wanted to have two dresses and if your fabric was cut so the grain was straight.

Having spent so long cutting the fabric out, I then took about half an hour to hand baste the long seam so I could be certain that all the stripes matched up. I am pleased that taking the effort to do this paid off – even I can’t see the seam in the picture above but it is there!

It took me less than 10 minutes to run through the overlocker and hey presto I had a dress! Just goes to show  that taking the time to do things properly at an early stage really pays off.